How to bypass
Google account verification for Alcatel
Another brand prone
to dealing with FRP lock issues is Alcatel.
Fortunately, we found some instructions on how to
bypass Google verification on Alcatel One
Touch models,
Idol, Pixi, Fierce, and other models coming from this
brand.
FRP bypass for
Alcatel instructions
- Reset
the phone and power it back on
- Choose your preferred language, then tap on
Start
- Connect the phone to a Wifi
Network (preferably your Home network)
- Skip several steps of the setup until you reach
the Verify Account screen
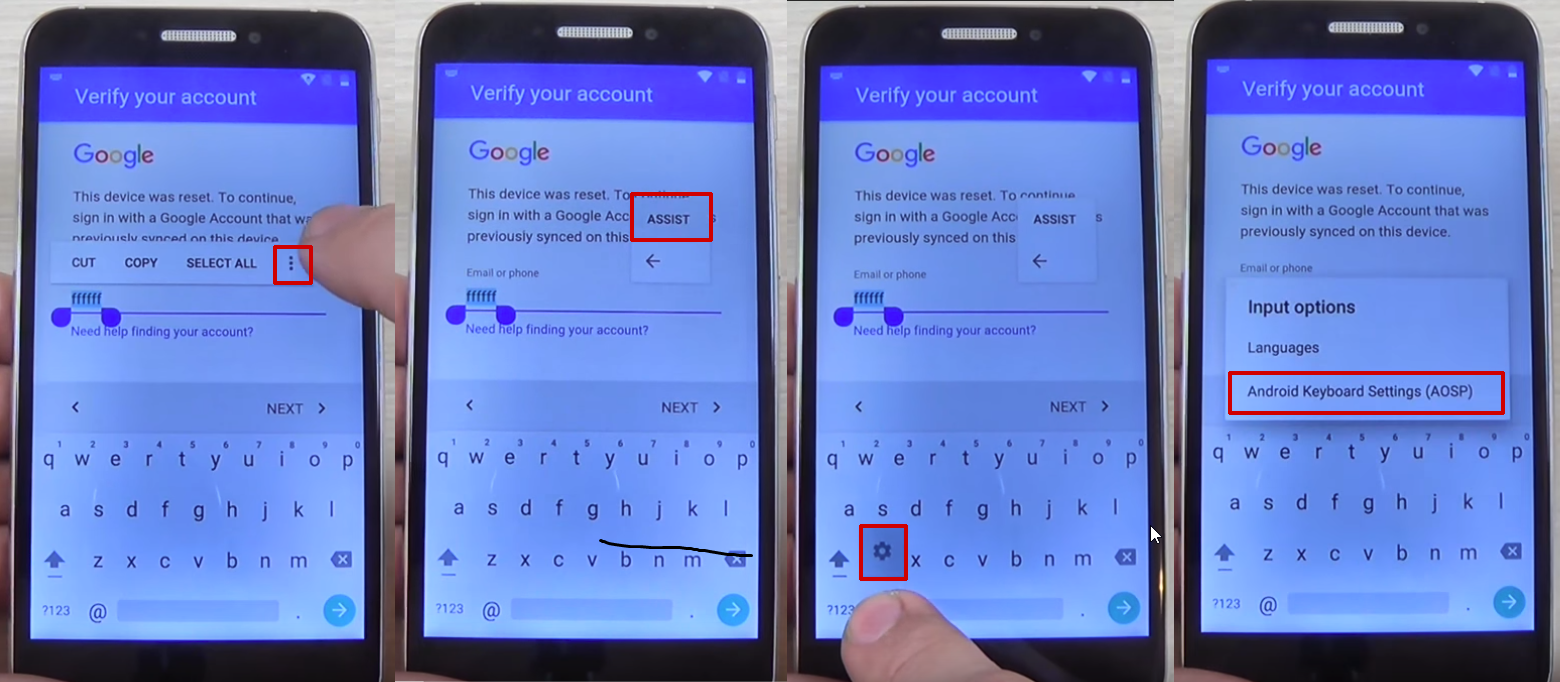
- Tap on the email field, in order to activate the
keyboard, and type anything you want
- Long press the text you entered, until a menu
with Cut, Copy, Select all, and three dots appears.
Press the three dots.
- The
Assist
option will appear. Tap on it. In most cases, this
won’t work, so press the @ symbol at the bottom of the
keyboard, until the Gear icon appears. Tap on that
one.
- A new menu will appear. From
here, tap on Android Keyboard
Settings.
- From this new menu, tap on
Text Correction, then go to Personal
Dictionary and tap
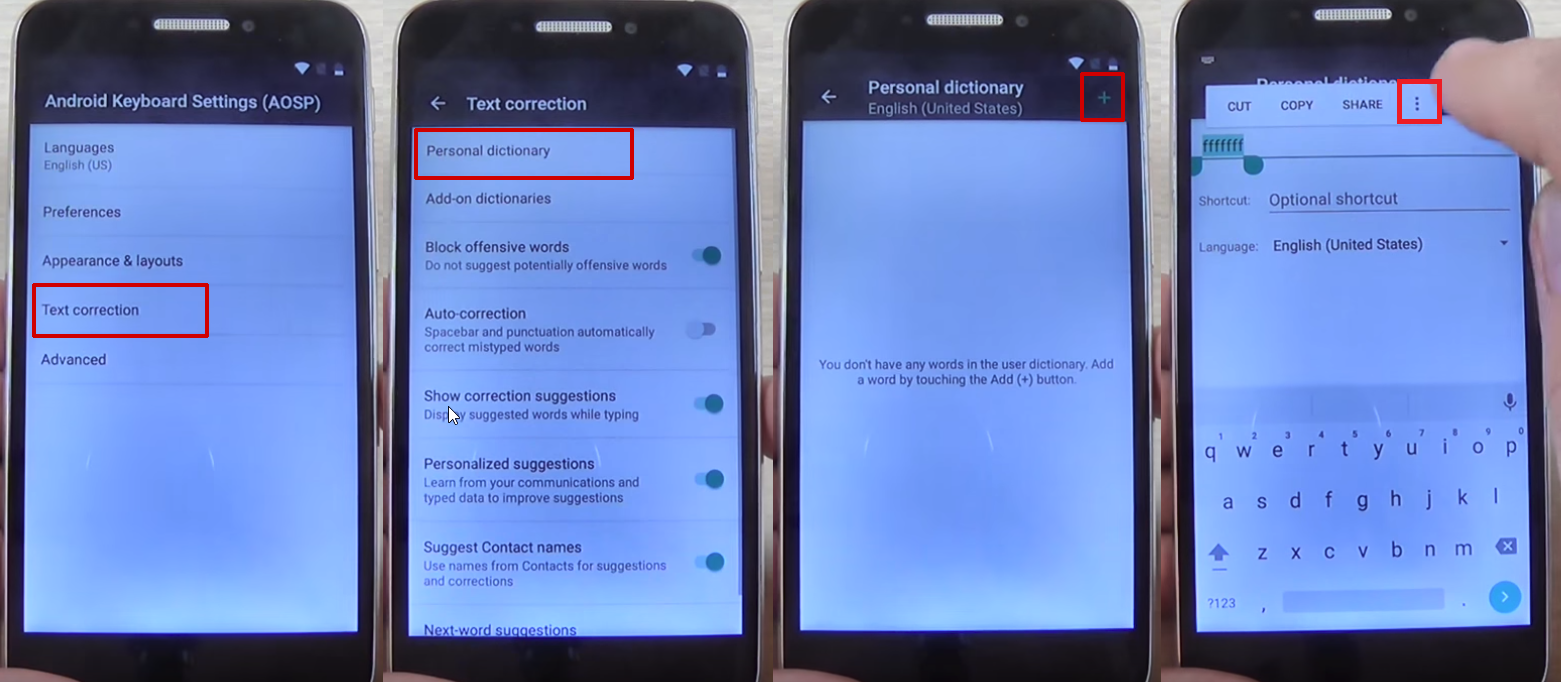
on English (United States)
- Tap on the + icon in the upper right
corner
- On the first field, type
anything you want and long press on the text until a
menu appears, with Cut, Copy, Share, and three dots.
Tap on the three dots
- You will be taken to Google Search.
Here, type “chrome” in the search bar and tap on it from
the drop-down menu
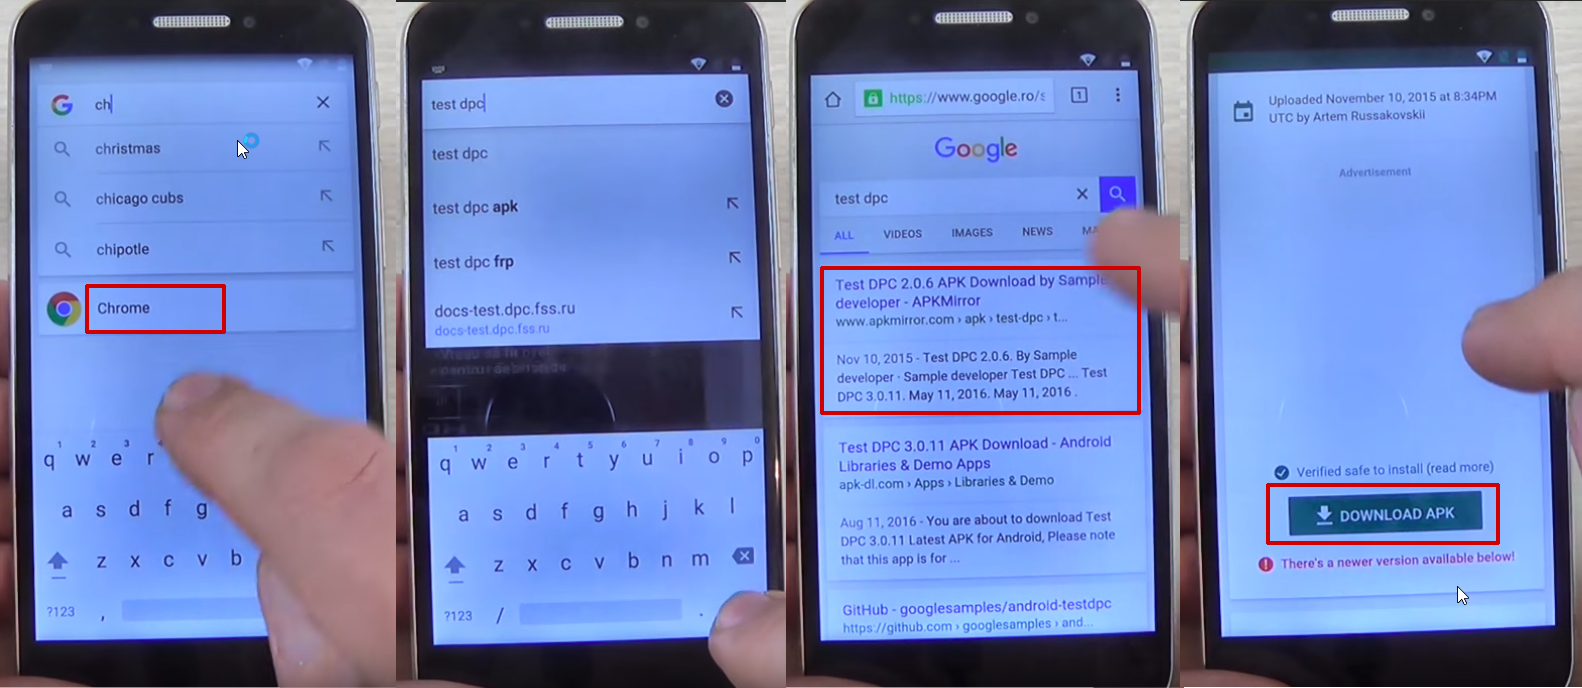
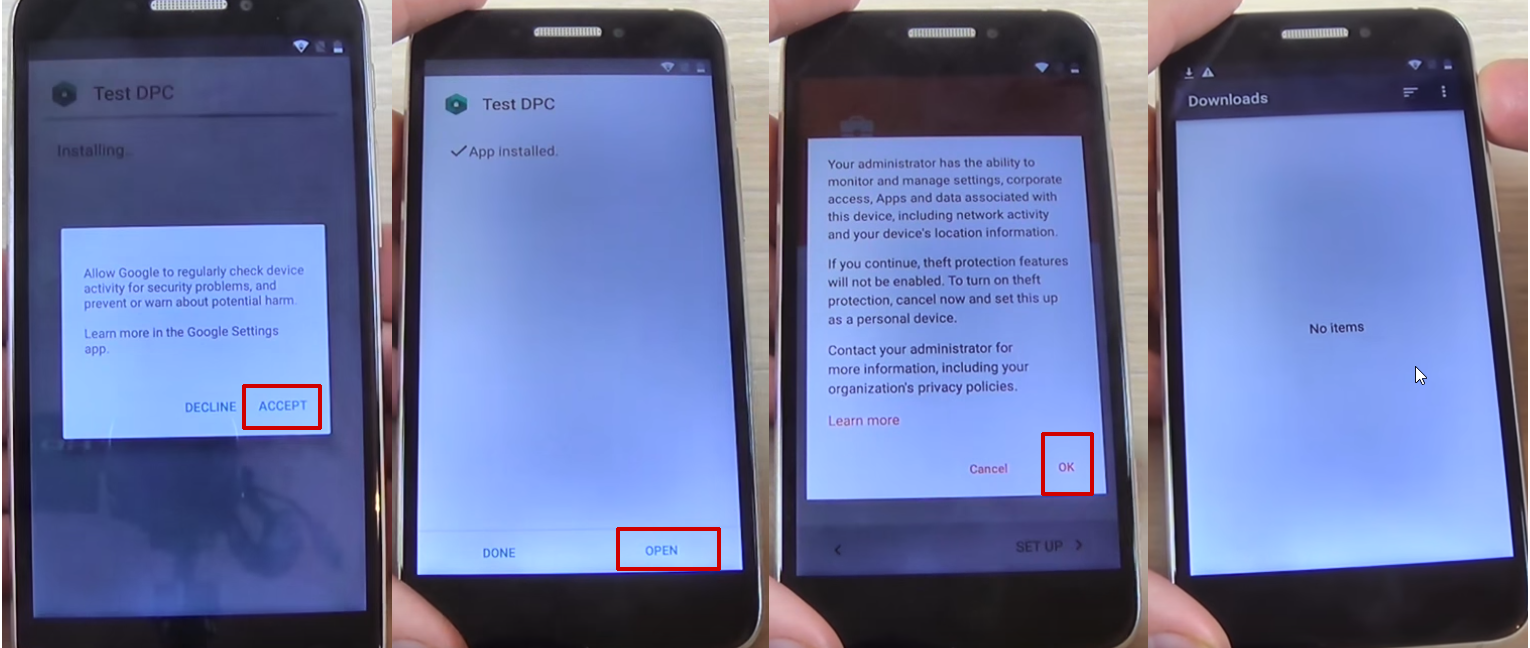
- Tap on
Accept and Continue, then No, thanks
- In Chrome’s search bar, type “test
dpc” and tap on
it
- Tap on the first
result
- Scroll to the bottom of the
page and tap Download APK
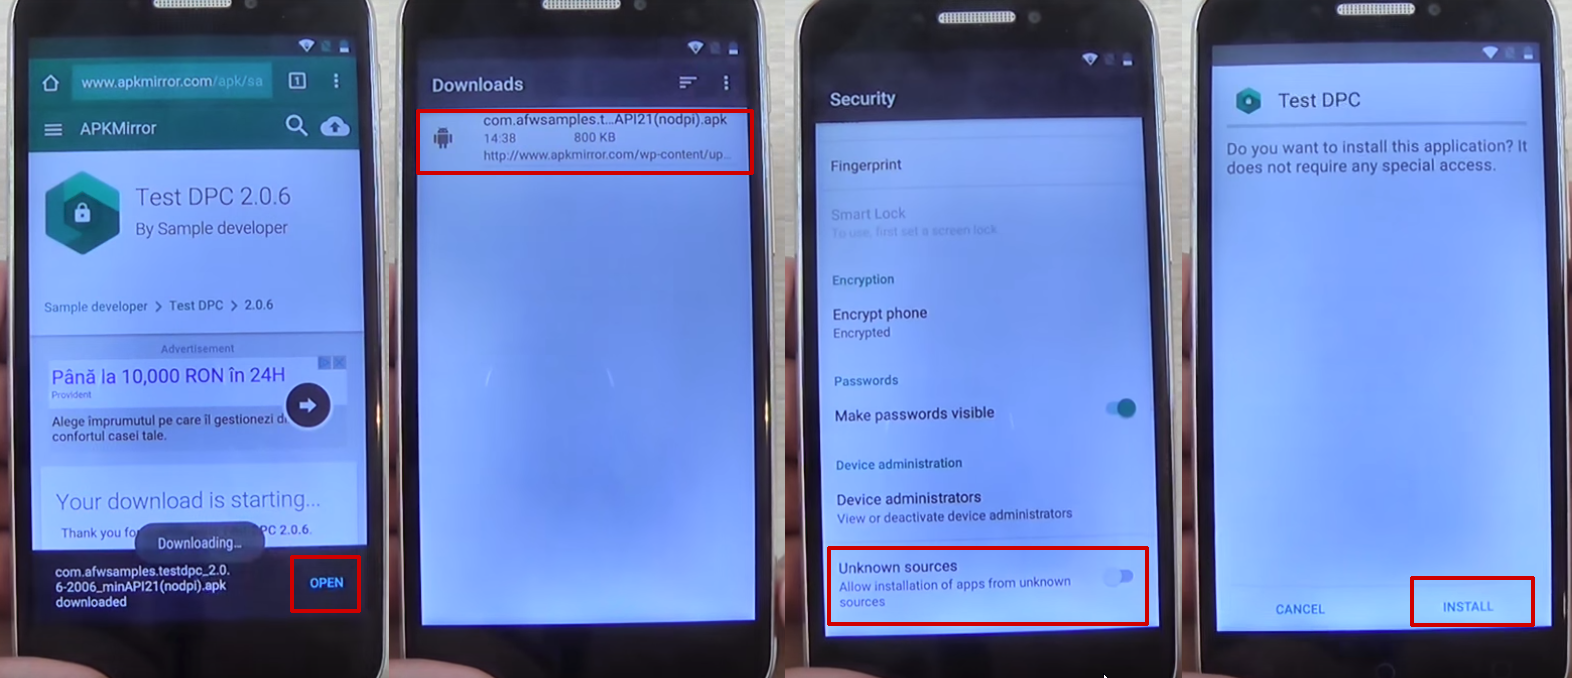
- You will get a message saying that the
download could harm your device since it’s from an
external source. Tap Ok
- Tap on the apk package you just downloaded, in
order to start installing it. Your phone will show a
pop-up, saying that the installation is blocked. Tap
on the Settings button and allow installation from
unknown sources,
then tap Ok
- Hit the back key
until you see the apk package again and tap on
it
- You will be asked if you
want to install the Test DPC apk, so tap the
install
button
- During the installation process you will
see a pop-up message. Tap on
Accept
- Wait until the
installation process is ready and tap on
Open
- You will see the
Setup Management
screen. Tap on Set up device owner, then Set
up
- In the next screen, tap on
Set up.
A new pop-up message will be shown. Tap on
Ok
- Wait until the device owner
is being set
- The apk package
will show once again, but will shortly disappear and
the Downloads folder will be shown, with no items in
it.
- Restart your phone
- Unlock the phone and you will be taken
automatically to the Test DPC app, which will show the
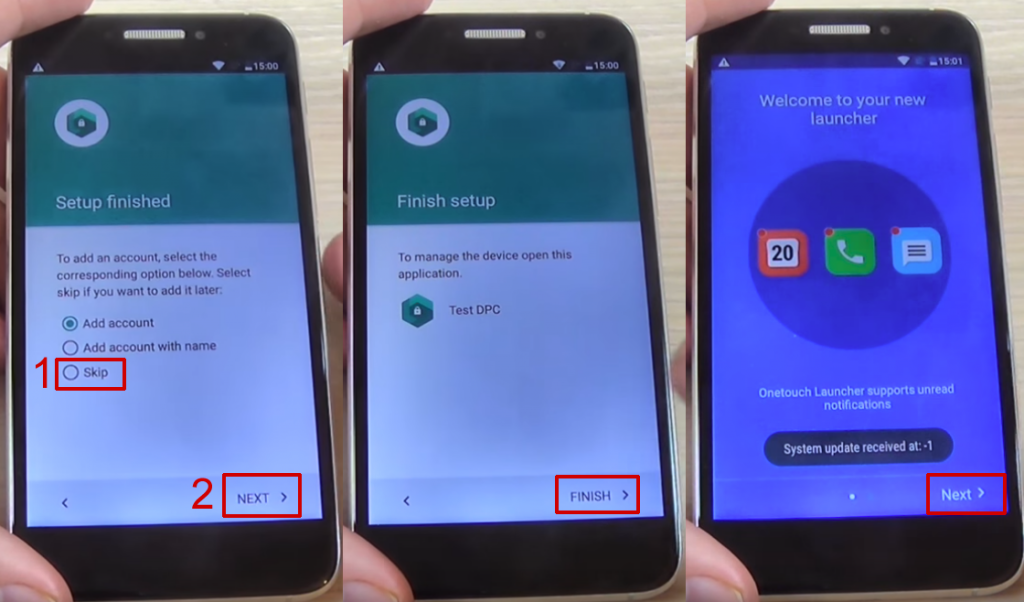
Set up finished screen
- Check
Skip,
then tap on Next
- On the
next screen, tap Finish. You will be taken to the
initial setup process. Click next until you are taken
to the phone’s home screen
- Go to Settings > Backup and reset >
Factory data reset and tap on Reset
Phone
- Tap on Reset
Everything
- Wait until the phone
restarts and go through the setup process
- DO NOT connect to a Wi-Fi network, then
hit Next until the setup is finished
- Configure the phone’s launcher
- That’s it, your phone won’t ask for the Google
account anymore.
If this method doesn’t work,
due to your phone coming with another keyboard, you
can try the steps below:
- Reset the phone and power it back
on
- Choose your preferred
language, then tap on Start
- Connect the phone to a Wifi Network (preferably
your Home network)
- Skip several
steps of the setup until you reach the
Verify Account screen
- Tap on the email field, in order to activate the
keyboard, and type anything you want
- Tap on the hand
key, in the bottom
left corner. This will take you to the Swype
keyboard’s menu
- From this menu,
type on Gestures
- Scroll
down until you find the Search option, with the
“Highlight some text and Swipe from the
*swipe key* to the S to do a quick web search” text
This previous step
is very important since it actually shows you how you
can make a search, even though the phone has a FRP
Android lock.
- Tap the back key
twice, until you get to the Verify your
account screen
again
- Type on the Enter your email
field again, to make the keyboard pop up, and write a
random text, like “bypass test”
- Swipe from the bottom left corner
button until the letter “S” on the keyboard. This should open the Google
Search app
- In Search, type
Settings
and select it
- Go to Backup
& Reset > Factory data reset and tap on
it
- Tap the Reset
Phone button, at
the bottom. Confirm with the Erase
Everything button.After this, your phone will
restart
- You will be taken to the
initial setup menu. Select English as your language, then tap
the Next
button
- Tap Skip/Next until you get
to the phone’s home screen. While going through these
steps, you will be asked to connect to a Wi-Fi
network. DO NOT connect.
And that’s it! Your Alcatel
phone won’t ask for the Google account verification
anymore.
How to use a FRP bypass
app
Finally, let’s talk about another popular method
to bypass Google account activation, done through cable and
with a special app. Several users reported that it
works for most Samsung phones, while the number of
phones from other manufacturers which can be bypassed
like this is reduced. However, it’s worth trying.
In order
to use this method, you need the following things:
- OTG cable
- USB stick
- FRP bypass
app
- A stable Wi-Fi
connection
Download the
app and
copy it on your USB stick. After making sure you have
all these, you can start by following the next
steps:
- Restart the
phone and select English as your language of choice,
then tap on Next
- Skip the Insert
SIM card screen, then connect the phone to a Wifi
Network (preferably your Home network)
- Check the “I understand and agree to
the terms and conditions above”, as well as the “No
thanks”, then tap
Next
- You will be
taken to the Verifying your account page, where you
will see the default message, generated by the FRP
lock: “This device was reset. To continue,
sign in with a Google Account that was previously
synced on this device.”
This is where the OTG cable and the USB stick
come in. Insert the stick in your PC, then connect the
phone, using the cable. In a few moments, the File
Manager will appear on the phone’s screen.
- In the File Manager, you should see the
Bypass Any Samsung Account Lock folder. Tap on it, then tap
on the folder inside the folder as well. Here you
should find two files: Guide.txt and Bypass Any
Samsung Account Lock.apk. Tap on the latter
- In most
cases, an Install Blocked message will appear. Tap on
the Settings button
- In the next
screen, check the Unknown sources option
- A new screen will appear. Here, check
Allow this installation only, then hit Ok
- You will be taken to the Development
Settings screen,
where you will see the “Do you want to
install this application? It does not require any
special access.”
Tap on Install and wait until the process is over
- Tap on Open
The app is now
installed, so you can access the phone’s settings menu
easily.
- While in the
Settings menu, scroll until you find Backup
and Reset, then
tap on it.
- Go to
Factory data reset, tap on it, then tap the
Erase everything button.This will take a few minutes.
- After the phone is erased,
it will restart and take you to the initial setup
screen again.
- Remove then OTG
cable and go through the setup again. You will not be
prompted for the Google account credentials
again.
How to solve special issues
and situations which can occur during the bypassing
process
Even though the majority of users claim that the
instructions presented above work and help them, there
are some situations in which they get stuck at
specific steps, due to various reasons.
We’ve identified
some of the most common problems and offered some
quick solutions, in order to make bypassing quicker.
Phone doesn’t have the Google
keyboard: This
happens because some phones have a custom UI the
manufacturer installs. In this case, the solution is
to opt for the last method to bypass Google account
presented here, using an app and a cable.
Long-pressing doesn’t show any menu: This depends on the
manufacturer and the type of display. If a long-press
doesn’t reveal anything, just press for a few extra
seconds or apply more pressure on the touchscreen.
The keyboard’s Settings menu doesn’t
show: This depends
on the version of the keyboard you’re using. In some
cases, instead of @, you can press the comma or
whatever button is in the bottom left corner to access
this menu.
Wrap-up
This is how you can successfully bypass Google
account verification on your phone, whether it’s a
Samsung, LG, HTC or another popular brand.
Obviously, there
are several others which you can use to get over this
problem. Specifically, you will need a cable or some
free software available online, but the solutions from
our guide have the biggest success rate.
If you encounter
any issues during the process, please let us know,
using the comments section, or contact our support
team and they will surely offer a valid
resolution.


.jpg)


